
- 6 sc in KA
- 6 inc (12)
- (1 sc, inc) * 6 times (18)
- (2 sc, inc) * 6 times (24)
5-6. 24 sc (2 rounds) - (2 sc, dec) * 6 times (18)
8-9. 18 sc (2 rounds)
Attach the legs to the body using cotter pin joints between rounds 4 and 5. The distance between the joints should be 12 stitches. - 3 sc, dec, 8 sc, dec, 3 sc (16)
- (2 sc, dec) * 4 times (12)
Attach the arms to the body using cotter pin joints between rounds 10 and 11. The distance between the joints should be 8 stitches. - 2 sc, dec, 4 sc, dec, 2 sc (10)
- 10 sc
Continue crocheting the head: - 10 inc (20)
- (4 sc, inc) * 4 times (24)
- 5 sc, inc, 12 sc, inc, 5 sc (26)
17-18. 26 sc (2 rounds) - 6 sc, dec, 10 sc, dec, 6 sc + 1 offset stitch (24)
Insert the eyes between rounds 18 and 19, leaving 4-5 stitches between the eyes. - (4 sc, dec) * 4 times (20)
- (2 sc, dec) * 5 times (15) + 1 offset stitch
- (1 sc, dec) * 5 times (10)
- 5 dec.
Do not close the opening yet; this will be used for shaping the snout.
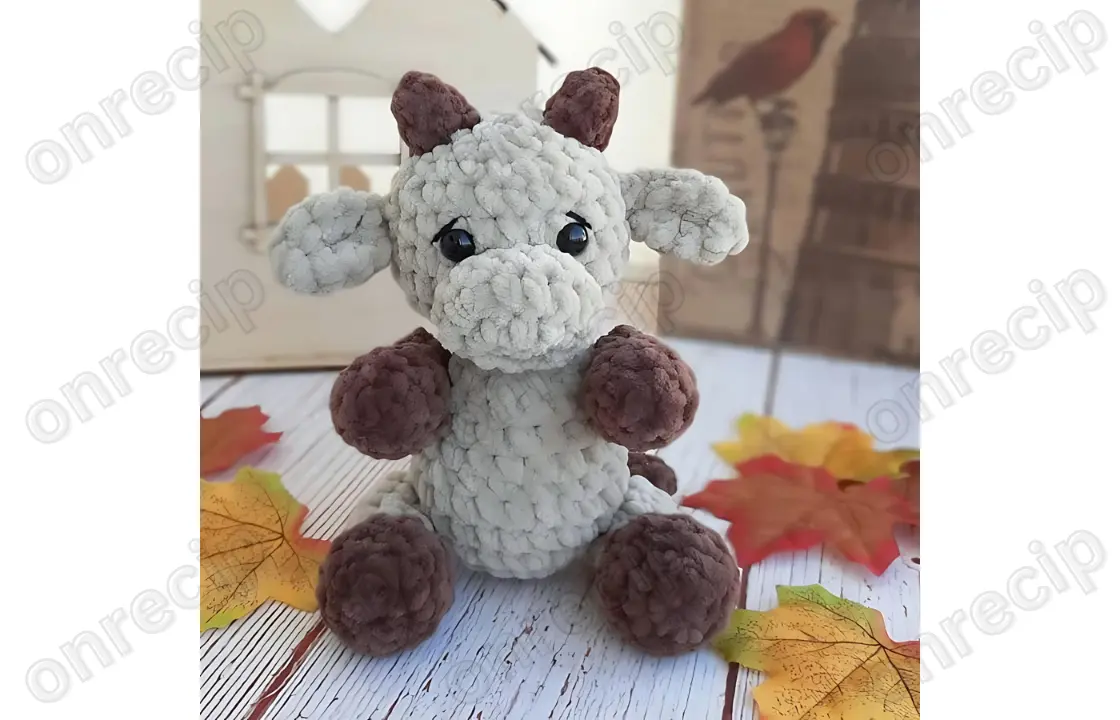
Plush Bull Crochet Snout:
- 5 ch
- From the second chain from the hook: inc, 2 sc, 3 sc in one stitch, 3 sc (10)
- Inc, 3 sc, inc, inc, 3 sc, inc (14)
- Inc, 6 sc, inc, 6 sc (16)
- 10 sc, sl st
In round 5, the stitches should be along the top and sides of the snout.
Tail:
Chain 6 with light-colored yarn. Leave a yarn tail for sewing at the start of the chain.
Attach dark yarn, crochet 3 sc in the last chain stitch, join into a ring, 3 inc (6), 6 sc, 3 dec (3).
Crochet one more stitch to make the tail tip look neat. Cut the yarn and weave in the ends.
Assembly:
- Sew the snout onto the head.
- Shape the snout:
- Insert the needle into the opening in the head, bringing it out in the middle of the snout at the level of the second row from the bottom, make one stitch, and bring the needle back through the opening in the head. Slightly pull the thread and tie it off.
- Insert the needle into the opening and bring it out where the first time, then insert it again, leaving a 2-stitch gap, and bring it out through the opening, tying it off.
- Repeat on the other side.
- Embroider the eye outlines. You can insert and bring out the needle through the head opening, tie the thread, and hide the ends.
- Close the opening on the head.
- Sew on the horns, ears, and tail.
by @dary_toys – Instagram: @dary_toys
Enjoy!
Pages: 1 2
I am excited and can’t wait to make the Plush Baby Bull. My plan is to get it done for my daughter for Christmas. One suggestion I would like to make is not to make it so hard to get a copy of the pattern. I love these patterns and would love to make some for gifts.