
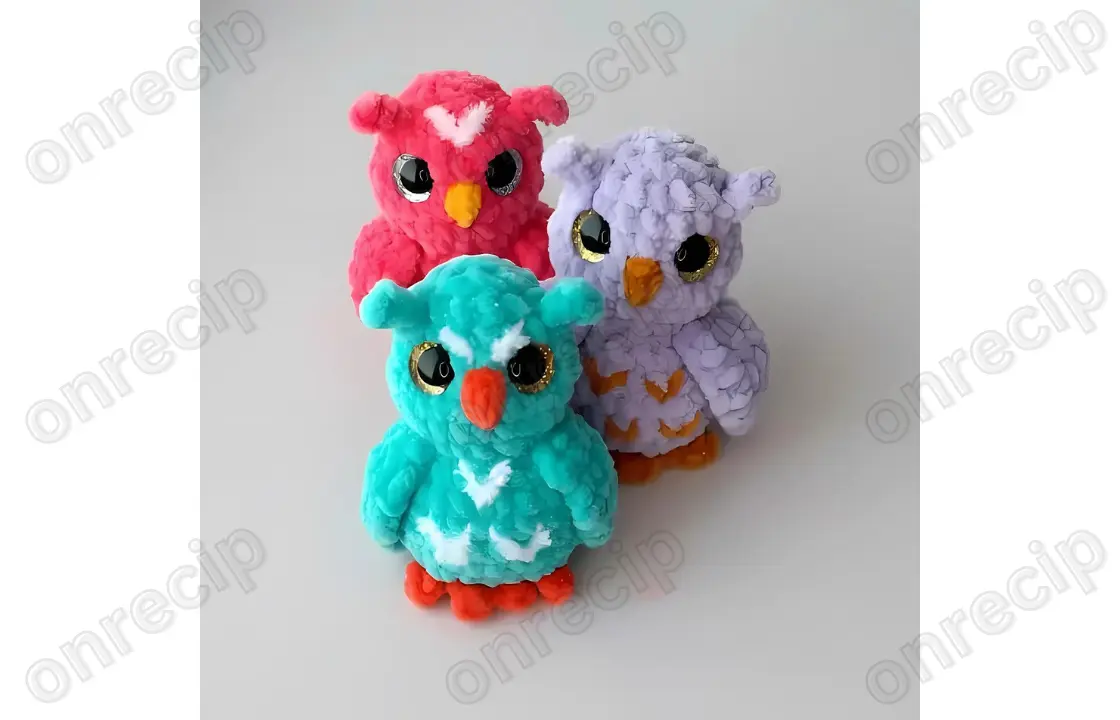
Difficulty Level: Intermediate
This free crochet pattern by Svetlana Malysheva (@malysh_love_toys) allows you to crochet a plush baby owl keychain. Any plush yarn is suitable for amigurumi. The author recommends Himalaya Dolphin, and for embroidering feathers, Himalaya Koala. You can use yarn alternatives as well. The yarn consumption is small.
The finished toy size is about 7-8 cm.
Materials and Tools:
- Himalaya Dolphin Baby yarn for the body and wings (12g is enough), an additional color for the feet and beak (less than 2g)
- Himalaya Koala yarn for embroidery and detailing
- Hook size: 4 mm
- 14 mm safety eyes for toys
- Stuffing for toys
- Stitch markers
- Pins
- Cord or keychain carabiner
- Needle for sewing parts
- Scissors
Abbreviations:
- KA – Magic ring
- ps – Slip stitch
- ch – Chain stitch
- sc – Single crochet
- inc – Increase
- dec – Decrease
- (…) x n – Repeat n times
Instructions for crocheting the Owl Keychain:
Body and Head:
Start by chaining 6, and from the second chain from the hook, crochet:
- inc, 3 sc, 4 sc in the last stitch, continue along the other side of the chain, 3 sc, inc (14)
- 2 inc, 3 sc, 4 inc, 3 sc, 2 inc (22)
3-4. 22 sc (2 rows)
Use a stitch marker to keep track. The marker should be placed on the side of the body. If needed, make a slip stitch to adjust.
- 14 sc, 2 dec, 4 sc (20) – Decreases should be centered.
- 20 sc
- (2 sc, dec) x 5 (15)
- (3 sc, dec) x 3 (12)
At this point, you can stuff the lower part and shape the sides.
- (inc, 1 sc) x 6 (18)
- inc, 7 sc, 2 inc, 7 sc, inc (22) – Increases are placed at the sides, follow the marker.
11-12. 22 sc (2 rows) - dec, 5 sc, 3 dec, 5 sc, 2 dec (16)
In the next round, you’ll create the brows.
- 1 sc, ch 3. From the 2nd chain from the hook, work 3 sc along the chain (the last sc goes into the base stitch), 6 sc in the center, ch 3. Work 3 sc along the chain (the last sc in the base stitch), 9 sc (16)
Place the safety eyes between the 12th and 13th rounds, spaced 5 stitches apart between the feet of the eyes.
- dec, 4 sc, dec, 8 sc (14) – Decreases at the start and end of the ears.
Stuff the head and shape the cheeks.
- Work 8 dec to close the hole. Tighten the ring, secure the yarn, and hide the tail.
Wings (make 2):
Chain 4, from the 2nd chain from the hook, work in rows:
- 3 inc, ch 1 (6)
2-3. 6 sc, ch 1 (2 rows) - inc, 4 sc, inc, ch 1 (8)
- 4 dec, ch 1 (4)
- 2 dec (2)
- dec, ch 1 (do not cut the yarn)
To hide the yarn ends in the wings: lay the working yarn along the nearest edge of the wing, measure about 10 cm, then thread the yarn through the needle and sew along the edge using a “running stitch” until you reach the starting yarn. Flatten the wing, making sure it is not gathered. Then trim the yarn, leaving a small tail. Remove any fluff from the yarn and tie a few knots, cutting off any excess.
Feet (make 2):
Chain 4, from the 2nd chain from the hook, work in reverse along the chain:
- 2 sc, sl st into the last stitch (first toe). Immediately chain 3, from the 2nd chain from the hook, work 2 sc, sl st into the starting point (second toe).
Remove any fluff from the yarn and tie several knots, cutting off any excess.
Assembly and Detailing:
At the beginning and end of the first row, mark the position of the feet. For symmetry, pin the feet with pins. Sew them following the direction shown in the pattern (see the photo).
Symmetrically pin the wings in place. The distance between them should be 3 sc in front and back. Sew them between the rounds of the head and body, attaching them along the upper edge of the wing. Secure the yarn and hide the tails.
Between the 12th and 13th rounds of the head, where you placed the eyes, mark the center stitch (top of the beak) with a pin. Then step down 2 rows and place another pin in the center (bottom of the beak). Embroider the beak in a triangle shape using 5-7 stitches.
Embroider small “V” shapes on the body and head as desired. Your cute little owl is ready!
Author: Svetlana Malysheva / translated by onrecip
Enjoy!
