
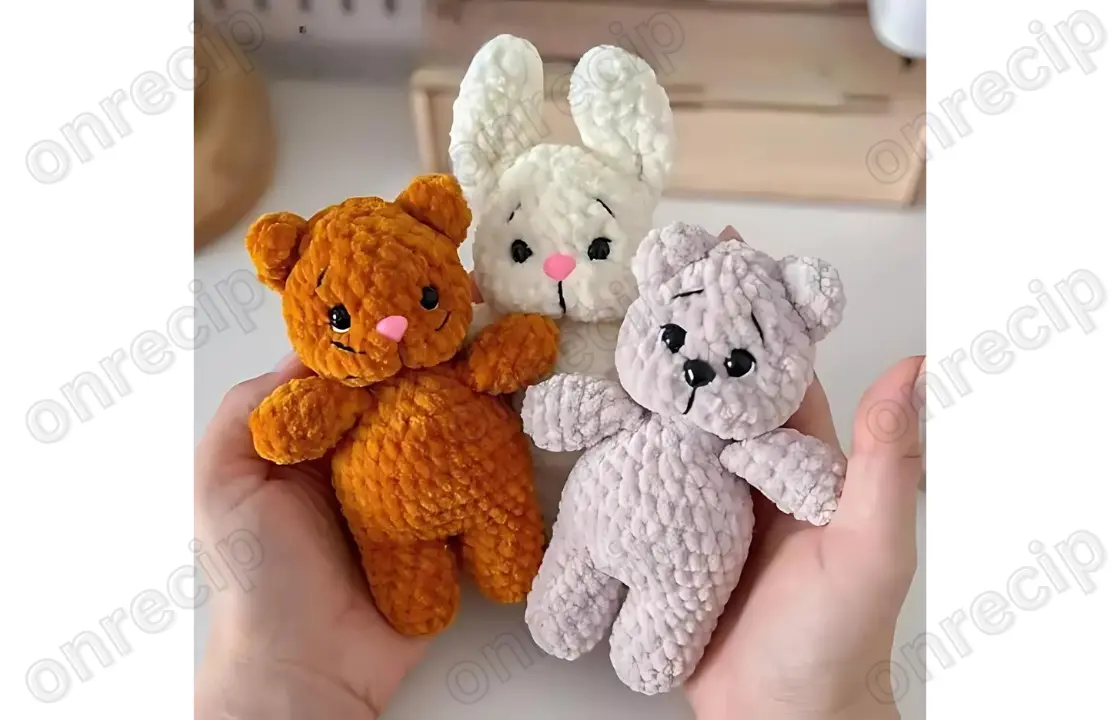
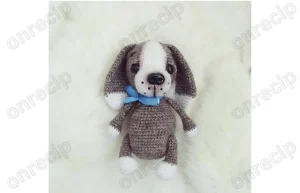
Difficulty level: easy
Using this pattern, you can crochet plush animals such as a bunny, a kitten, and a bear using the same base pattern. The only differences are the ears and tails. You will need safety eyes and noses for the faces, as well as black and white smooth yarn for embroidering details. Sculpt the faces to give them more expression.
Materials and Tools:
- Plush yarn (e.g., Wolans Bunny Baby, Himalaya Dolphin Baby, etc.)
- Cotton-blend yarn YarnArt Jeans: 01-white (for eye details), 53-black (for outlining eyes, eyebrows, and face)
- Hook: 3.5 mm
- Safety eyes: 8 mm
- Safety noses: 7×9 mm (pink for bunny and kitten, black for the bear)
- Toy stuffing
- Stitch markers
- Pins
- Needle for sewing pieces together
- Scissors
Abbreviations:
- MR — magic ring
- ch — chain
- sl st — slip stitch
- sc — single crochet
- inc — increase
- dec — decrease
- (…) x n — repeat the instructions inside the brackets n times
Pattern for all plush animals (bunny, kitten, bear):
Upper Legs (make 2):
- 5 sc in MR or 2 ch, 5 sc in 2nd ch from hook (5)
- (inc) x 5 (10)
3-6. 10 sc (10)
Stuff just the bottom part of the leg. - Fold in half, sc dec x 2, sl st.
Leave a long tail for sewing.
Lower Legs (make 2):
- 6 sc in MR or 2 ch, 6 sc in 2nd ch from hook (6)
- (inc) x 6 (12)
3-7. 12 sc (12)
On the first leg (right leg), finish with a sl st. On the second leg, continue to the body.
Body:
- ch 2, join with the left leg and work 12 sc around it, 2 sc in the chains, 12 sc around the right leg, 2 sc in the chains.
- 5 sc, inc (for the side), 13 sc, inc (for the side), 5 sc, (1 sc, inc) x 2 to form the belly.
3-6. 32 sc - (6 sc, dec) x 4 (28)
- (5 sc, dec) x 4 (24)
Start stuffing the legs and body. - (4 sc, dec) x 4 (20)
- (3 sc, dec) x 4 (16)
- (2 sc, dec) x 4 (12)
- (1 sc, dec) x 4 (8)
Continue crocheting the head.
Head:
- (inc) x 8 (16)
- (1 sc, inc) x 8 (24)
- (2 sc, inc) x 8 (32)
4-6. 32 sc (32) - (6 sc, dec) x 4 (28)
- (5 sc, dec) x 4 (24)
- (4 sc, dec) x 4 (20)
Insert the safety eyes between rows 7 and 8, leaving a gap of 3-4 stitches between them. Stuff the head, especially around the neck to make it stable.
- (3 sc, dec) x 4 (16)
- (2 sc, dec) x 4 (12)
- (1 sc, dec) x 4 (8)
- dec x 2, pull the hole closed with a hook or needle.
Bunny Ears:
- 5 sc in MR or 2 ch, 5 sc in 2nd ch from hook (5)
- (inc) x 5 (10)
3-7. 10 sc (10)
Fold in half, work 5 sc, fold in half again and work 2 sc, sl st. Leave a long tail for sewing.
Bunny Tail:
- 6 sc in MR or 2 ch, 6 sc in 2nd ch from hook (6)
- 6 sc (6)
Leave a long tail for sewing.
Bear Ears:
- 6 sc in MR or 2 ch, 6 sc in 2nd ch from hook (6)
- (1 sc, inc) x 3 (9)
- 9 sc (9)
Fold in half, work 3 sc together, finish with a sl st. Leave a long tail for sewing.
Bear Tail:
- 6 sc in MR or 2 ch, 6 sc in 2nd ch from hook (6)
- 6 sc (6)
Leave a long tail for sewing.
Kitten Ears:
- 3 sc in MR or 2 ch, 3 sc in 2nd ch from hook (3)
- (inc) x 3 (6)
- (1 sc, inc) x 3 (9)
Fold in half, work 4 sc together. Leave a long tail for sewing.
Kitten Tail:
- ch 11
- sc in the 2nd ch from hook and work 10 sc
Leave a long tail for sewing.
Face Sculpting and Embroidery:
Cut a piece of thread for face sculpting.
Start sculpting the eyes. Insert the needle in the first row of the head, near the inside corner of the eye to be sculpted. Pull the needle out near the outer corner of the eye, thread the yarn around the inner corner, and pull the needle back through the head.
Do the same for the other eye, then tie a knot between the eyes. Use the remaining yarn to sculpt the mouth and nose.
Sewing Pieces Together:
Sew the arms between rows 10 and 11 of the body. Position them directly above the legs.
Attach the ears to the head, adjusting the placement to your preference. Use sewing pins to position them before sewing.
Sew the tail on the lower back.
Your plush animals are now ready! Please tag the author on social media @plyshatoys if you share your creations.
Author: Elizaveta Igošina / translateed by onrecip
Enjoy!