
Pull the stitches tight, secure the thread, cut, hide the end. Stuff the leg. For the second leg, secure the thread on the wrong side near the 23rd stitch, start with it and make ch (in the next row, ignore it), crochet:
- Row 24. 7 sc, next stitch in the 12th marked stitch – 8 sc, inc, 2 sc (19)
- Rows 25-30. according to the description of the first leg.
Pull the stitches tight, secure the thread, cut, hide the end. There are 4 stitches left between the legs on each side. Stuff the body and leg through this hole. Sew up the hole.
Ears (2 pieces)
- Row 1. 4 sc in CA (4)
- Row 2. (1 sc, inc) x 2 (6)
- Row 3. (1 sc, inc) x 3 (9)
- Row 4. (2 sc, inc) x 3 (12)
- Row 5. (3 sc, inc) x 3 (15)
- Row 6. (4 sc, inc) x 3 (18)
Secure the thread, cut, hide the end.
Head
- Row 1. 6 sc in CA (6)
- Row 2. (inc) x 6 (12)
- Row 3. (1 sc, inc) x 6 (18)
- Row 4. (2 sc, inc) x 6 (24)
- Row 5. (3 sc, inc) x 6 (30)
- Row 6. (4 sc, inc) x 2, inc, 8 sc, inc, (inc, 4 sc) x 2 (36)
- Row 7. 4 sc, (inc) x 2, 5 sc, (inc) x 3, 9 sc, (inc) x 3, 4 sc, (inc) x 2, 4 sc (46)
- Row 8. 6 sc, inc, 6 sc, (inc, 1 sc) x 3, 9 sc, (inc, 1 sc) x 3, 6 sc, inc, 5 sc (54)
- Row 9. 6 sc, inc, 1 sc, inc, 7 sc, inc, 3 sc, inc, 12 sc, inc, 3 sc, inc, 8 sc, inc, 1 sc, inc, 5 sc (62)
- Rows 10-11. 62 sc (62)
In the 12th row, we crochet the ears in, for this, we place them top-down in front of the head, first insert the hook into the ear stitches, then the head, and crochet them together.
- Row 12. 6 sc, 9 sc with ear stitches, 32 sc, 9 sc with ear stitches, 6 sc (62)
- Row 13. 6 sc, 9 sc along the ear stitches, 32 sc, 9 sc along the ear stitches, 6 sc (62)
- Row 14. 62 sc (62) crochet 1 offset stitch
- Row 15. 6 sc, dec, 1 sc, dec, 7 sc, dec, 3 sc, dec, 12 sc, dec, 3 sc, dec, 6 sc, dec, 1 sc, dec, 7 sc (54)
- Row 16. 6 sc, dec, 6 sc, (dec, 1 sc) x 3, 9 sc, (dec, 1 sc) x 3, 6 sc, dec, 5 sc (46)
- Row 17. 4 sc, (dec) x 2, 5 sc, (dec) x 3, 9 sc, (dec) x 3, 4 sc, (dec) x 2, 4 sc (36)
- Row 18. (4 sc, dec) x 2, dec, 8 sc, dec, (dec, 4 sc) x 2 (30)
- Row 19. (3 sc, dec) x 6 (24)
- Row 20. (2 sc, dec) x 6 (18)
- Stuff the part with filler.
- Row 21. (1 sc, dec) x 6 (12)
- Row 22. (dec) x 6 (6)
Tighten the hole, secure the thread, cut, and hide the end. Sew the head to the body.
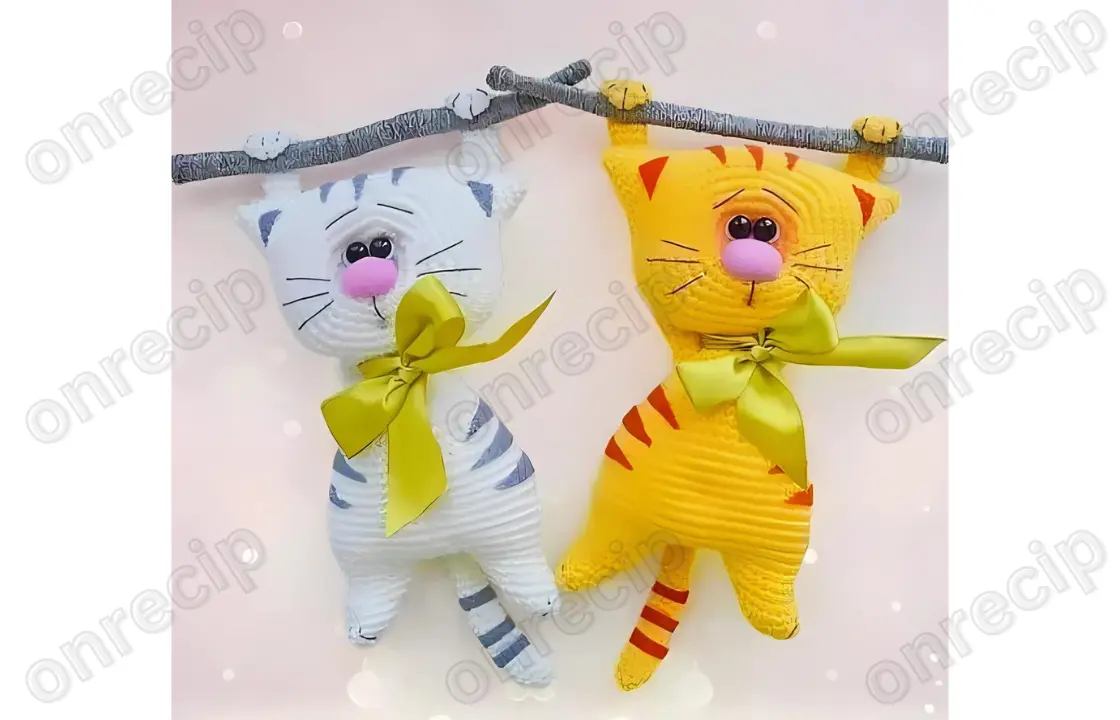
Embroider stripes and a face. Glue eyes. You can make the eyes yourself from polymer clay, paint them with acrylic paints, or buy ready-made ones.
Make a bow around the neck and tie it with a ribbon.
Author: Galina Pisarenko
Enjoy!

What is meant by “offset stitch” in Row 14? Where can I find directions for the arms?
Thank you for this wonderful pattern
Did I miss something? I don’t see a tail or the front paws. Made the head and body but no tail or front paws! Please help it’s so cute!
Lovely pattern but could you show the part for front paws and tail please 😻