
Mini Penguin Crochet Pattern – Cute Amigurumi Penguin for Beginners
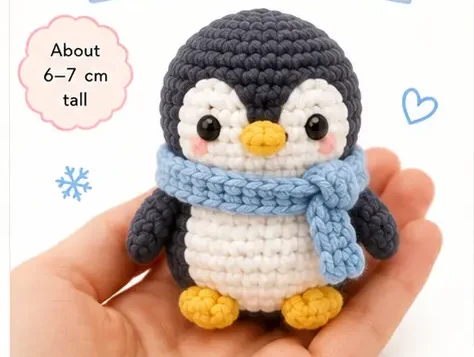
Looking for an adorable winter-inspired crochet project? This Mini Penguin Crochet Pattern is the perfect tiny amigurumi design for crochet lovers who enjoy cute handmade animals, kawaii plushies, and beginner-friendly projects. With its round little body, tiny yellow feet, and cozy scarf, this crochet penguin is impossible to resist.
This miniature penguin works up quickly and is ideal for gifts, keychains, holiday ornaments, nursery decor, or craft fair products. Whether you are new to amigurumi or already experienced with crochet toys, this tiny penguin pattern is fun, relaxing, and easy to customize.
Why You’ll Love This Mini Penguin Crochet Pattern
- Beginner-friendly amigurumi project
- Quick and easy to crochet
- Perfect for winter and Christmas decor
- Great for handmade gifts
- Small portable crochet project
- Cute kawaii penguin design
- Ideal for keychains and ornaments
The finished penguin measures approximately 6–7 cm (2.4–2.8 inches) tall depending on yarn type and crochet tension.
Materials Needed
To crochet this tiny penguin, you will need:
- Sport weight cotton yarn
- Dark gray yarn
- White yarn
- Yellow yarn for beak and feet
- Pink yarn for blush (optional)
- Light blue yarn for scarf (optional)
- 2.0–2.5 mm crochet hook
- 6 mm safety eyes
- Fiberfill stuffing
- Yarn needle
- Stitch marker
- Scissors
Cotton yarn is highly recommended because it gives neat stitches and helps the penguin keep its shape.
Crochet Abbreviations (US Terms)
This mini penguin pattern uses simple amigurumi stitches:
- MR = Magic Ring
- sc = Single Crochet
- inc = Increase
- dec = Invisible Decrease
- sl st = Slip Stitch
- st = Stitch
- FO = Fasten Off
These basic stitches make the project suitable for beginners.
Mini Penguin Crochet Pattern
Penguin Body
Using dark gray yarn:
- Begin with a magic ring
- Increase gradually to create the round penguin shape
- Crochet several rounds evenly
- Decrease slowly to shape the top
Stuff the body firmly before closing to keep the penguin round and stable.
Belly Piece
Using white yarn:
The belly section is crocheted separately and sewn onto the front of the body. This creates the classic penguin appearance with a soft rounded tummy.
Flatten slightly before attaching for a clean finish.
Face Pieces
Crochet two white face circles and sew them slightly above the belly area. Leave a small gap between them for the beak placement.
This gives the penguin its adorable expressive face.
Wings
The wings are made using dark gray yarn and lightly flattened before sewing onto the sides of the body.
Position them evenly for a balanced look.
Beak
Using yellow yarn:
Create a tiny beak and pinch it into a triangle shape before sewing between the eyes.
This tiny detail adds personality and charm to the penguin.
Feet
The feet are crocheted with yellow yarn and shaped into tiny toes.
Attach them carefully to the bottom so the penguin can sit upright.
Optional Crochet Scarf
The scarf adds extra winter charm and coziness.
Simply crochet a short chain and work single crochet stitches across. Wrap around the penguin’s neck and tie gently.
You can customize the scarf color for different holiday themes.
Assembly Instructions
- Sew the face pieces onto the body.
- Attach the belly below the face.
- Sew the beak between the eyes.
- Add safety eyes securely.
- Sew the wings onto the sides.
- Attach the feet at the bottom.
- Add blush under the eyes if desired.
- Wrap the scarf around the neck.
Take your time with assembly for the cutest results.
Tips for Perfect Amigurumi Penguins
Use Tight Tension
Tight stitches help prevent stuffing from showing through.
Stuff Firmly
Firm stuffing helps maintain the penguin’s rounded body shape.
Position Features Symmetrically
Evenly placed eyes, wings, and feet create a more professional finish.
Use Stitch Markers
This helps beginners track rounds more easily.
Creative Ways to Use Your Mini Crochet Penguin
This tiny penguin makes a wonderful:
- Christmas ornament
- Winter decoration
- Handmade gift
- Desk buddy
- Backpack charm
- Keychain accessory
- Nursery shelf decoration
- Craft fair item
You can also make multiple penguins in different scarf colors for seasonal collections.
Frequently Asked Questions
Is this penguin crochet pattern beginner-friendly?
Yes! The pattern mainly uses simple single crochet stitches and easy shaping techniques.
What yarn works best for amigurumi?
Sport weight cotton yarn is ideal because it provides clean stitch definition and durability.
Can I make the penguin larger?
Absolutely. Use thicker yarn and a larger crochet hook to increase the size.
How long does it take to make?
Most crocheters can finish this tiny penguin in a few hours.
Invisible Decrease Tutorial
The invisible decrease technique creates smooth shaping for amigurumi.
Steps:
- Insert hook into the front loop of the next stitch.
- Insert hook into the front loop of the following stitch.
- Yarn over and pull through both loops.
- Complete the single crochet normally.
This method creates cleaner decreases with fewer visible gaps.
Final Thoughts
This Mini Penguin Crochet Pattern is an adorable and satisfying amigurumi project that combines simplicity with irresistible cuteness. Its tiny size, soft winter style, and beginner-friendly construction make it perfect for crochet lovers of all skill levels.
Whether you are making holiday gifts, decorating for winter, or creating products for your handmade shop, this tiny penguin will quickly become one of your favorite crochet projects.
Grab your crochet hook, pick your favorite yarn colors, and start creating your own cute mini penguin today! 🐧💙