
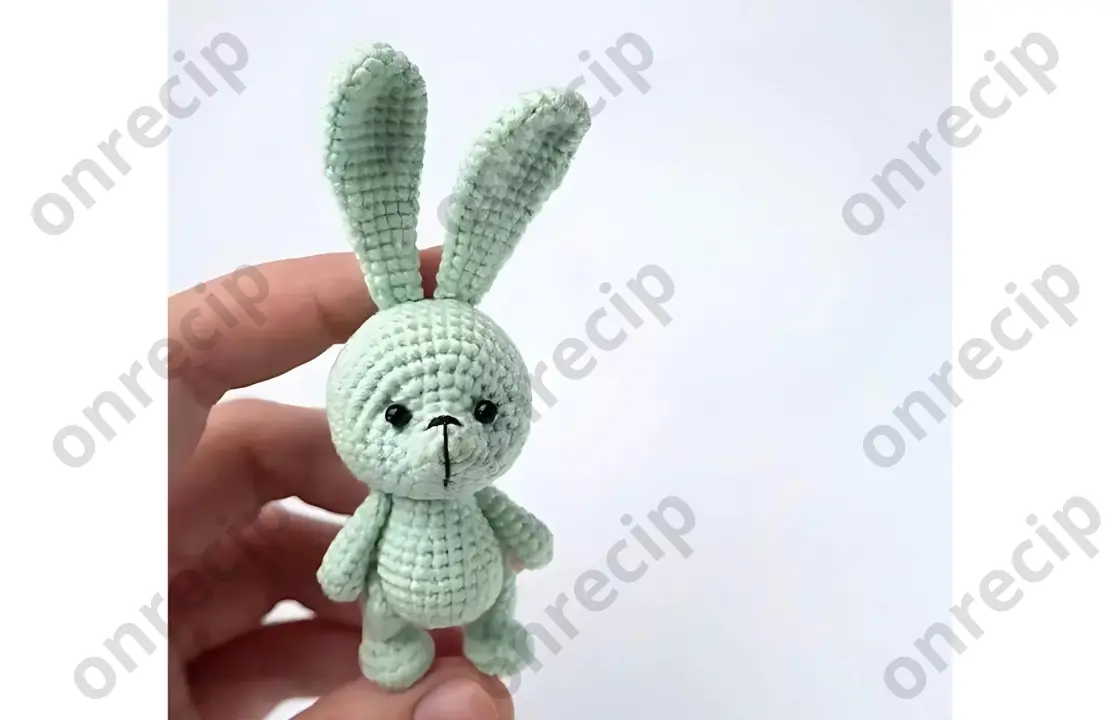
Difficulty level: easy
Using this description, you can crochet a small bunny using the amigurumi technique. Any half-cotton yarn will do: YarnArt Jeans, Alize Cotton Gold, Vita Coco, Gazzal Baby Cotton, and others. The author recommends using YarnArt Jeans and splitting the thread into two parts.
Materials and tools
- Any yarn
- Suitable crochet hook
- Eyes for toys
- Needle
- Thread for sewing
- Scissors
- Stuffing for toys
Description of amigurumi crochet for Little Bunny
Head
Start crocheting the head from the muzzle.
- 6 sc in MR
- 6 inc (12)
- 12 sc
- (sc, inc) x 6 (18)
- 3 sc, (sc, inc) x 6, 3 sc (24)
- 4 sc, inc, (2 sc, inc) x 6, 4 sc (30)
- 3 sc, (3 sc, inc) x 6, 3 sc (36)
- 5 sc, inc, (4 sc, inc) x 5, 5 sc (42)
9-14. 42 sc - (5 sc, dec) x 6 (36)
- 36 sc
- (4 sc, dec) x 6 (30)
- (3 sc, dec) x 6 (24)
- (2 sc, dec) x 6 (18)
- (sc, dec) x 6 (12)
- 6 dec
Cut the thread, tighten the opening, and hide the end.
Ears (2 parts)
- 6 sc in MR
- 6 inc (12)
- (sc, inc) x 6 (18)
4-9. 18 sc - (4 sc, dec) x 3 (15)
11-12. 15 sc - (3 sc, dec) x 3 (12)
14-15. 12 sc - (2 sc, dec) x 3 (9)
17-18. 9 sc - (sc, dec) x 3 (6)
Cut the thread, leaving a long end for sewing.
Head assembly
Proceed to assemble the head (secure all threads at the bottom of the head where the body will be attached). Make indentations and sew the eyes, placing them between rows 5 and 6 (approximately 7 sc apart from row 5). Embroider the nose. Sew the ears approximately between rows 11 and 12.
Body
- 6 sc in MR
- 6 inc (12)
- (sc, inc) x 6 (18)
- (2 sc, inc) x 6 (24)
- (3 sc, inc) x 6 (30)
6-8. 30 sc - 4 sc, (dec, 2 sc) x 5, dec, 4 sc (24)
10-11. 24 sc - (2 sc, dec) x 6 (18)
13-14. 18 sc - (sc, dec) x 6 (12)
- 6 dec
Cut the thread and tighten the opening with a needle, hiding the thread end.
Legs (2 parts)
- 6 sc in MR
- 6 inc (12)
- (sc, inc) x 6 (18)
- 18 sc
- 3 sc, 6 dec, 3 sc (12)
- 3 sc, 3 dec, 3 sc (9)
- 9 sc
- (2 sc, inc) x 3 (12)
9-11. 12 sc - 6 dec
Cut the thread and tighten the opening with a needle, hiding the thread end.
Arms (2 parts)
- 6 sc in MR (6)
- 6 inc (12)
- (2 sc, dec) x 3 (9)
4-8. 9 sc (9) - (sc, dec) x 3 (6)
Cut the thread and tighten the opening with a needle, hiding the thread end.
Tail
You can use a pom-pom.
- 6 sc in MR
- 6 sc
Cut the thread, leaving a long end for sewing.
Assembly of the toy
Sew the body to the head using thread fastenings. Attach the legs and arms using thread fastenings. Sew the tail to the body.
Author: @brooch_cott / translated by onrecip
Enjoy!

