
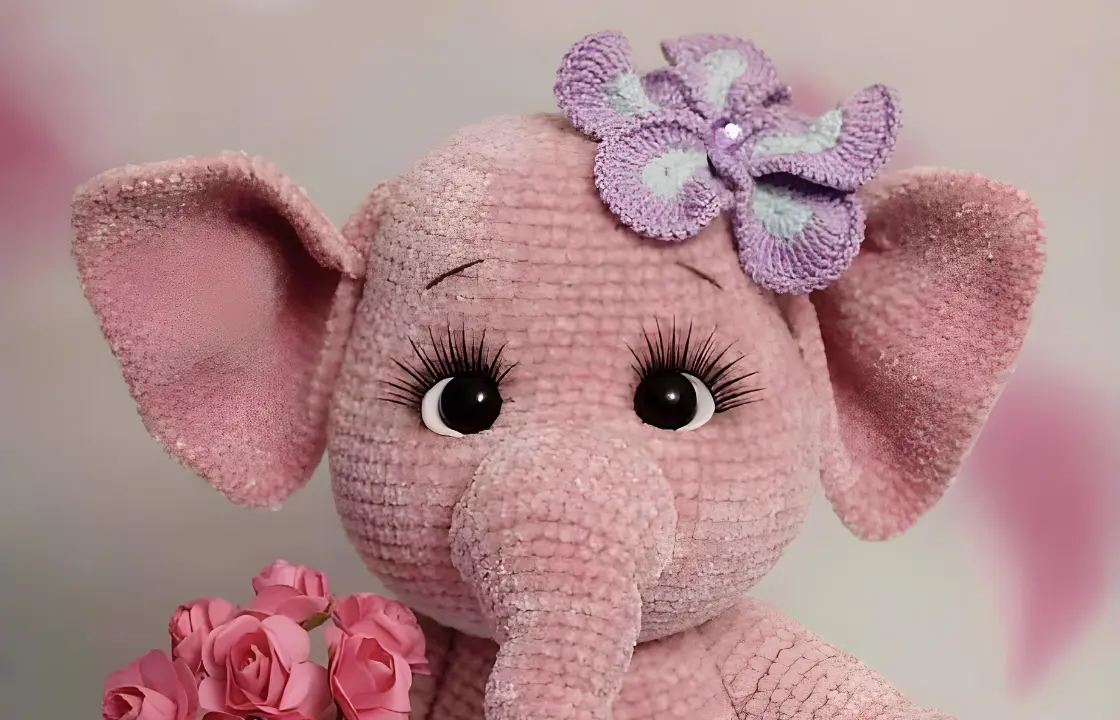
Discover a wide variety of free crochet patterns tutorials, including the adorable Amigurumi Little Cute Elephant. Start your next crochet project today!
Hello, dear Amigurumi Followers!
Today, we’re delighted to share another free amigurumi crochet pattern with you. As you know, we provide new amigurumi patterns every day. Some of our main patterns include amigurumi gazelles, bears, polar bears, pandas, penguins, giraffes, llamas, pigs, bunnies, clowns, lambs, bees, unicorns, dolls, foxes, dinosaurs, elephants, hippos, monkeys, cats, dogs, and more.
Today’s new amigurumi free crochet pattern is an adorable amigurumi elephant. Here are some details about this pattern:
If you enjoy making amigurumi, you’ll love this easy and free pattern. Your kids will adore these handmade toys!
Materials
Yarn İCE Yarn “Thin Chenille” (50g / 250m) light gray (1 skein), 2-3 meters white (for nails).
Yarn Kartopu “Nubuk” (100g / 550m) of light blue and blue colors (for scarf)
Hooks Tulip No. 2mm, Clover 1.75mm (for scarf)
Plastic joints for fastening hands 25 mm (2 pcs.), For fastening legs 30 mm (2 pcs.), For fastening the head 30 mm (1 pc.)
Black eyes with a secure mount with a diameter of 8mm
White felt
Thick plastic for foot insoles
Filler
Scissors
Needle for tightening
Black sewing thread for embroidery
Dry pastel for tinting
The growth of the finished toy using these materials is 18cm.
YARN FOR KNITTING AN ELEPHANT MAY BE PURCHASED HERE!
Abbreviations:
sc – single crochet
sl-st – slip-stitch
DC – double crochet
HDC – half DOUBLE crochet
inc – increase
dec – decrease
HANDLES (2 parts)
The row start marker runs in the center of the outside of the handle (for the left hand) and in the center of the inside of the handle (for the right hand).
1 pp.: 2 CH, in the 2nd loop from the hook: 6 sc (6)
2 pp.: (3 sc in one loop, 2 sc) * 2 (10)
3 pp.: (3 inc, 2 sc) * 2 (16)
4 pp.: ((1 sc, inc) * 3, 2 sc) * 2 (22)
5 pp.: ((2 sc, inc) * 3, 2 sc) * 2 (28)
6-7 pp: 28 sc (28)
8 pp.: (5 sc, dec) * 4 (24)
9 pp.: 24 sc (24)
10 pp.: 2 sc, dec, (4 sc, dec) * 3, 2 sc (20)
11 pp.: 4 sc, dec, 8 sc, dec, 4 sc (18)
12 p.: 1 sc, inc, (2 sc, inc) * 5, 1 sc (24)
13-18rr. (6 rows): 24 sc (24)
19 pp.: 3 sc, 5cc, 6 sc, 7 HDC, 3 sc (24)
20 pp.: 4 sc, (inc, 1 sc) * 2, 16 sc (26)
21-23rr. (3 rows): 26 sc (26)
24 pp.: 7 sc, dec, 8 sc, dec, 7 sc (24)
Insert a cotter pin with a diameter of 25 mm between the 23rd and 24th rows and between the 12th and 13th loops (for the left handle). For the right pen – in the vicinity of the marker. (I didn’t have a joint of the right diameter at hand, so I put the cotter pin. It is better to use one type of fastening).
25 pp.: 24 sc (24)
26 p.: 1 sc, dec, (2 sc, dec) * 5, 1 sc (18)
27 p.: (Dec, 1 sc) * 6 (12)
28 pp.: 6 dec.
Embroider a black thread with the elbows and marigolds:
LEGS (2 parts)
RIGHT LEG
The beginning marker of the row runs through the center of the back of the leg.
1 pp.: 2 CH, in the 2nd loop from the hook: 6 sc (6)
2 pp.: 6 inc (12)
3 pp.: (1 sc, inc) * 6 (18)
4 pp .: (inc, 2 sc) * 6 (24)
5 pp.: (3 sc, inc) * 6 (30)
From hard plastic we cut a circle equal in diameter to the foot (up to the 5th row)
6 pp .: 2 sc, inc, (4 sc, inc) * 5, 2 sc (36)
7 pp .: For the rear walls of the hinges: 36 sc (36)
8 pp.: (Knit the nails): 15 sc, (5 DC in one loop with a common vertex (white), 2 sc) * 2, 5 DC in one loop with a common vertex (white), 14 sc (36)
In order for the transition from color to color to be in place, we knit 14 loops, in the 15th loop we pick up the gray thread, and we knit it already white.
Ready to Learn More? Open the next page for Further Guidance!
What an amazing resource. Thank you
Thank you so much for sharing, elephants are my favorite animal Karma, love, happiness and all the good things they represent. My only daughter is pregnant and she will be having a baby girl in November, this is the best thing l can attempt to make for my grandchild, if l can’t do it then l will pay someone means a lot to me as l am not a well person. Thank you again and God Bless.