

Difficulty Level: Easy
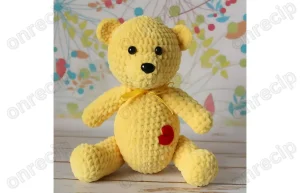
With this pattern, you can crochet a small Teddy Bear. For the patches, you will need small pieces of felt or fabric. Any fine yarn and a suitable crochet hook will work for this amigurumi. You can turn the bear into a brooch or keychain using special hardware.
Finished toy size — approximately 5-6 cm.
Materials and tools
- Gamma Iris yarn, color 0078, a small amount of pink, black, and white thread
- 1 mm crochet hook
- 3-4 mm toy eyes
- Stuffing for toys
- Black sewing thread
- 10 cm wire (1 mm thick)
- Felt for patches
- Glue
- Needle
- Scissors
Abbreviations
- KA — magic ring
- ch — chain stitch
- sl st — slip stitch
- sc — single crochet
- hdc — half double crochet
- dc — double crochet
- tr — treble crochet
- inc — increase (2 sc in 1 stitch)
- dec — decrease (2 sc together)
- (…) x n — repeat n times
Crocheting Instructions for Amigurumi Small Teddy Bear
Head
1: 6 sc in KA (6)
2: (inc) x 6 (12)
3: (sc, inc) x 6 (18)
4: (2 sc, inc) x 6 (24)
5: (3 sc, inc) x 6 (30)
6-11: 30 sc (6 rounds)
12: (3 sc, dec) x 6 (24)
13: (2 sc, dec) x 6 (18)
14: (sc, dec) x 6 (12)
15: (dec) x 6 (6)
Ears (2 pieces)
Crochet a magic ring, but don’t join. Turn your work, crochet 6 sc. Leave a thread for sewing.
Muzzle
1: ch 5
2: Along the chain, 3 sc, 3 sc in 1 stitch, 2 sc, inc (10)
3: inc, 2 sc, (inc) x 3, 2 sc, (inc) x 2 (16)
4: 16 sc
Leave a thread for sewing, lightly stuff the muzzle when attaching to the head.
Legs (2 pieces)
1: 6 sc in KA (6)
2: (inc) x 6 (12)
3-4: 12 sc (2 rounds)
5: 3 sc, (dec) x 3, 3 sc (9)
6-8: 9 sc (3 rounds)
Decrease to close the opening.
Arms (2 pieces)
1: 6 sc in KA (6)
2-6: 6 sc (5 rounds)
Body
1: 6 sc in KA (6)
2: (inc) x 6 (12)
3: (sc, inc) x 6 (18)
4: (2 sc, inc) x 6 (24)
5-8: 24 sc (4 rounds)
9: 6 sc, (dec) x 6, 6 sc (18)
10-13: 18 sc (4 rounds)
14: (sc, dec) x 6 (12)
15: 12 sc
16: (dec) x 6 (6)
Toy Assembly
Sew all the parts together.
Sew on the bead eyes.
Optionally, shade the muzzle.
Make patches from felt.
Author: Anna – @burgardt_toys
Enjoy!