
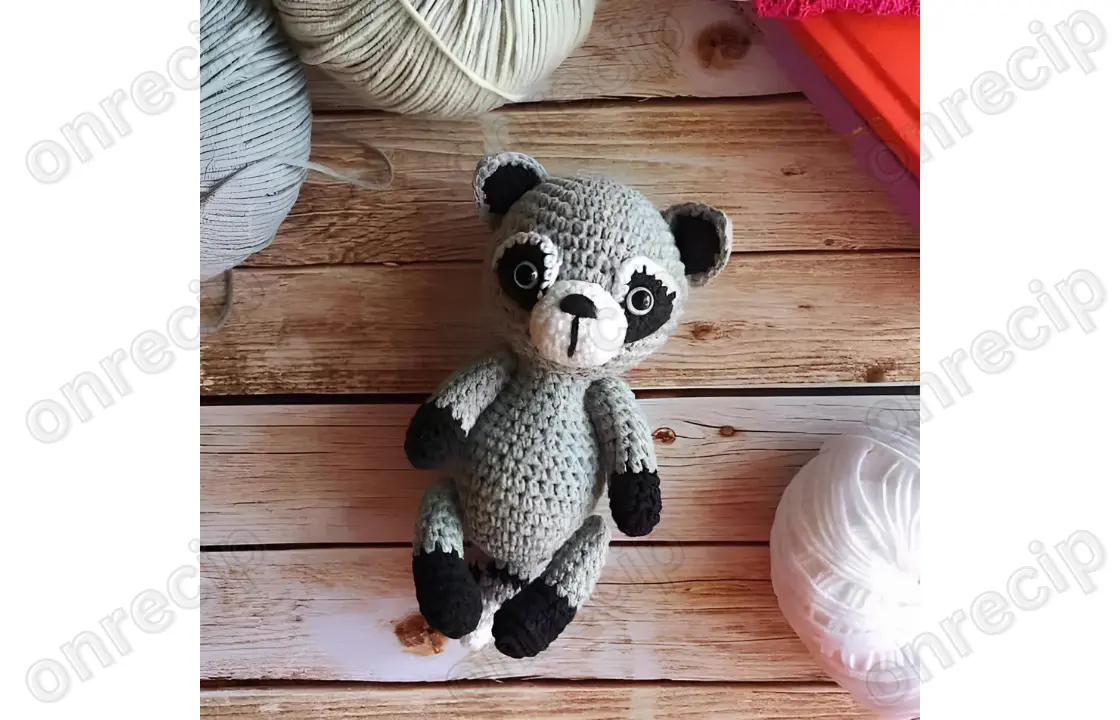
Muzzle
- Crochet a chain of 5 ch, then in the second stitch from the hook, inc, 2 sc, 4 sc in one stitch, then along the opposite side of the chain 2 sc, inc (12)
- sc, inc, 2 sc, (sc, inc) х 2, 3 sc, inc (16)
3-4. without changes (16) - Crochet half a row: 8 sc, sl st, fasten the yarn, leave a long tail for sewing.
Ears (2 parts)
Each ear consists of two parts, one crocheted with black yarn, the other with gray.
- 6 sc in KA
- (sc, 3 sc in one stitch) х 3, sl st, fasten the yarn
First, crochet the black part, cut the yarn, then crochet the gray part, do not make a sl st, do not cut the yarn, turn the gray part inside out, place it together with the black part, wrong sides together, and crochet around them with gray yarn:
- 4 sc, (sc, hdc, sc) in one stitch, 4 sc, fasten the yarn, leave a long tail for sewing. Tuck the yarn ends inside the ear.
Crochet the second ear in the same way.
Eyes (2 parts)
Crochet with Gazzal Baby Cotton, hook 1.5. With black yarn:
- 5 sc in KA, but do not close, ch, then turn and crochet in rows
- 2 sc, 3 sc in one stitch, 3 sc, ch, turn
- 3 sc, 3 sc in one stitch, 3 sc, then along the bottom edge of our triangle, crochet 5 sc, sl st.
We get such triangles that we still need to crochet around with white yarn.
Since we have a right and a left eye, we crochet them differently. For the right eye, start crocheting around from the top of the triangle (where we did 3 sc in one stitch) along the left edge: 5 sc, 2 sc in one stitch at the corner, and down along the bottom edge 5 sc (12), fasten the yarn, leave a long tail for sewing.
For the left eye, start crocheting around from the corner of the bottom edge: 5 sc, 2 sc in one stitch at the corner, 5 sc along the right edge (12), fasten the yarn, leave a long tail for sewing.
Insert the eyes into the center of our magic ring, fasten from the back side.
Tail
With white yarn:
- 6 sc in KA
- without changes (6)
- (sc, inc) х 3 (9)
- (2 sc, inc) х 3 (12)
- without changes (12)
Switch to gray yarn - (3 sc, inc) х 3 (15)
- without changes (15)
Switch to black yarn - without changes (15)
Switch to gray yarn
9-10. (2 rows) without changes (15)
Switch to black yarn - without changes (15)
Switch to gray yarn - without changes (15)
- (3 sc, dec) х 3 (12)
- (2 sc, dec) х 3 (9)
Stuff the part loosely as you go, do not stuff the last 2-3 rows, fold the part in half and join with 4 sc. Fasten the yarn, leave a long tail for sewing.
Assembly of the toy
Sew the head to the body.
Sew the muzzle, stuff it. The upper edge of the muzzle is located approximately after the 11th row of the head. Sew so that our 5 half-row is at the bottom.
Embroider the nose, using the photo as a reference.
Author: Elena Khlokhlova @ami.toys.
Enjoy!

