
Difficulty level: medium
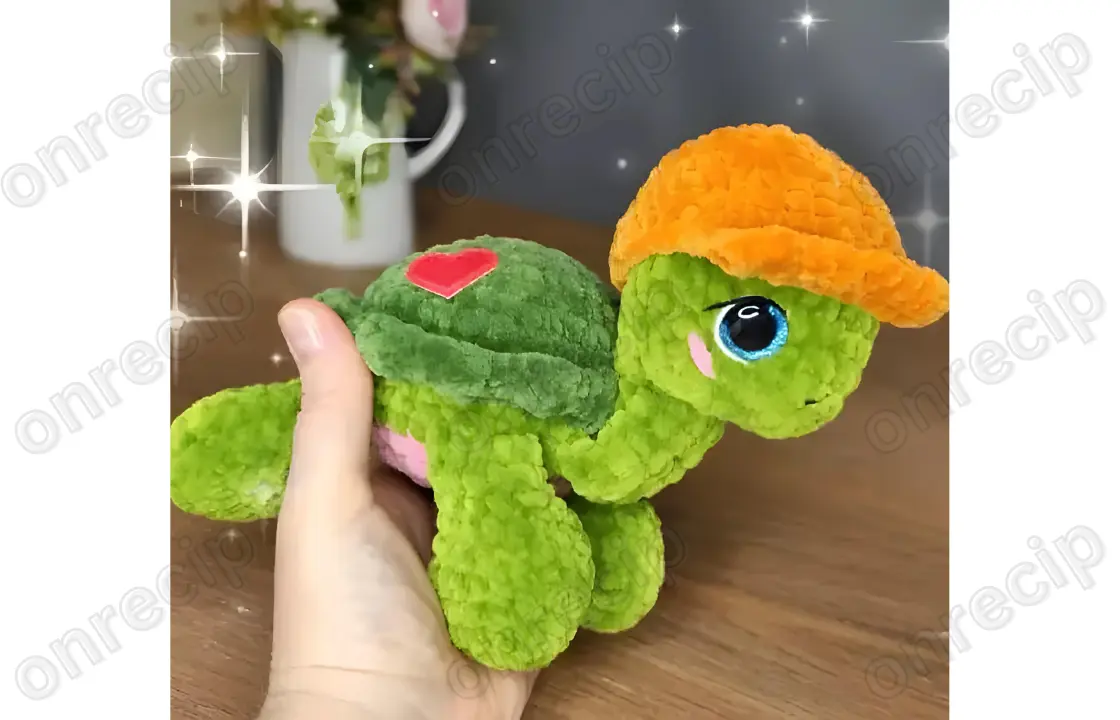
Free master class on knitting the Funny Turtle by Natalia Kovaleva.
Using this description, you can crochet a plush turtle in a hat or cap. For amigurumi knitting, you will need any plush yarn (Himalaya Dolphin Baby, YarnArt Dolce, Nako Panda Baby, etc.). The author offers two headwear options: cap and hat. You can knit a boy or a girl. They are also made of plush. For facial detailing, you need embroidery thread or thin yarn.
Materials and tools:
Plush yarn in 4 different colors (back, belly, body, hat)
Embroidery thread: black (for eyelashes and nose), white (for whites of the eyes), pink (for blush on cheeks)
Hook 4 mm
Eyes for toys 16-18 mm
Toy stuffing
Markers for knitting
Pins
Glue
Needle for sewing details
Scissors
Abbreviations:
КА — amigurumi ring
вп — chain stitch
cc — slip stitch
сбн — single crochet
ссн — double crochet
пр — increase
yб — decrease
(…) х n — repeat n times
Description of amigurumi knitting funny turtle in a cap or hat
Paws 4 pcs
Turtle body color:
- 6 sbn in KA (6)
- 6 pr (12)
- (1 sbn, pr) x 6 (18)
- 18 sbn
- 18 sbn
- 18 sbn
- (2 sbn, yb) x 5 (13)
The last 5th decrease is located at the beginning of the next row, in the next 8th row I count it as the first column
- (3 sbn, yb) x 3 (10)
Here, the last decrease also goes into the next row and is the first column in it - 10 sbn
- 10 sbn
Stuff the paw halfway. Crochet over both sides 5 sbn. Close the knitting, leaving a thread end 7-8 cm.
Tail (turtle body color)
Cast on 7 vp. Starting from the 2nd stitch from the hook, knit 6 sbn. Tie the ends, leave a length of 7-8 cm.
Head (turtle body color)
- 6 sbn in КА (6)
- 6 pr (12)
- (1 sbn, pr) x 6 (18)
- (2 sbn, pr) x 6 (24)
- (3 sbn, pr) x 6 (30)
- 30 sbn
- 30 sbn
- 30 sbn
- 30 sbn
- (3 sbn, yb) x 6 (24)
- (2 sbn, yb) x 6 (18)
At this stage, insert the eyes. Insert them between the 7th and 8th rows, leaving 8 columns between the legs of the eyes for eyes 18 mm in the finished toy, 6 columns are visible between the eyes. If you use smaller eyes, choose the optimal placement for them.
Ready to Learn More? Open the next page for Further Guidance!
