
Terms (us):
sc = single crochet (x-stitch)
hdc = half double crochet
sl st = slip stitch
dc = double crochet
inc = increase
dec = invisible decrease
ch = chain
mr = magic ring
fo = fasten off
Materials:
yarn in any size in white, dark
grey, pink
hook in corresponding size
yarn needle
polyester fiberfill
scissors
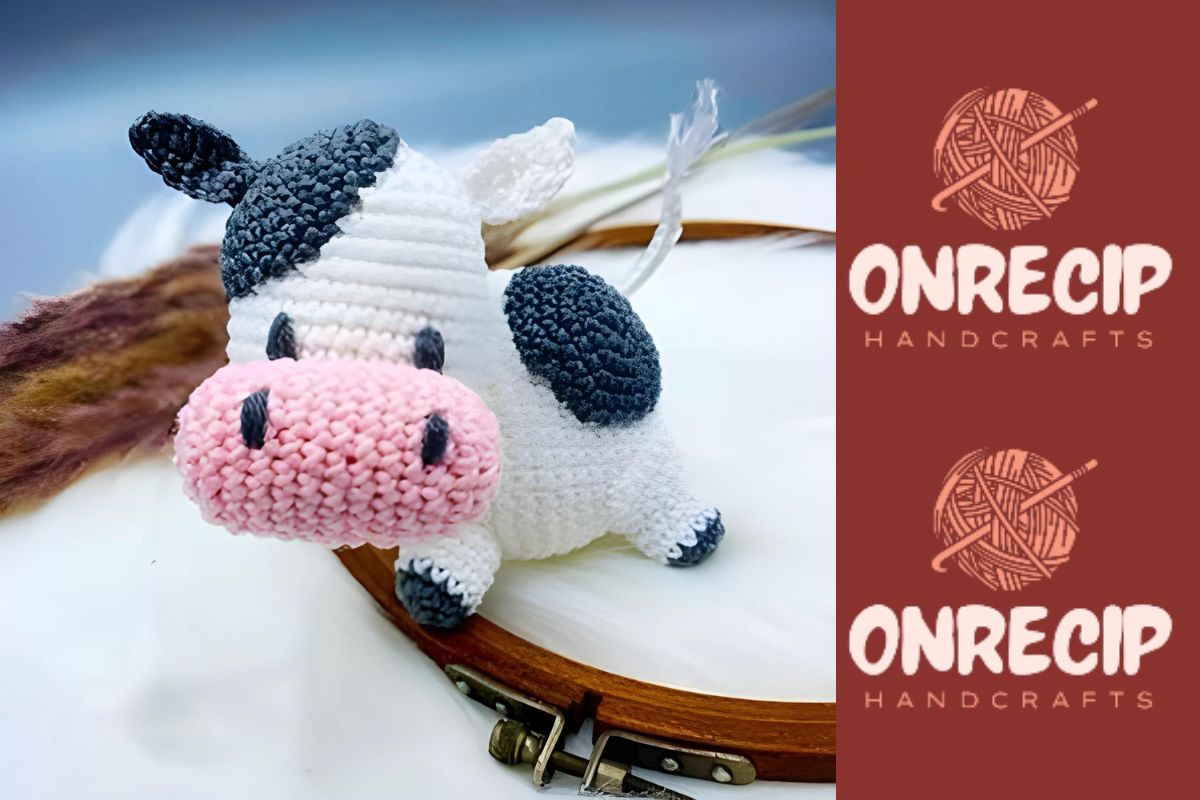
Head (make i in white yarn):
1. sc 6 into mr
2. incx 6 (12)
3. (sc, inc) x6 (18)
4. (2 sc, inc) x6 (24)
5. (3 sc, inc) x6 (30)
6. – 17. sc 30 (sc 30 for 12 rounds)
18. (3 sc, dec) x6 (24), begin stuffing the head
19. (2 sc, dec) x 6 (18)
20. (sc, dec) x 6 (12)
21. dec x 6 (6), Fasten off
Snout (make i using pink yarn):
1. sc 6 into mr
2. inc x 6 (12)
3. (sc, inc) x6 (18)
4. – 13. sc 18 (sc 18 for 10 rounds)
14. (2 sc, dec) x 6 (18), stuff snout
15. (sc, dec) x6 (12)
16. dec x 6 (6), Fasten off
Ears (make 2, one in grey, one in white):
1. ch 7
2. sc in second ch from the hook, hdc, dc, dc, hdc, sl st, ch 1, turn
3. sc 6, Fasten off
Body (make i using white yarn):
1. sc 6 into mr
2. incx6 (12)
3. (sc, inc) x6 (18)
4. (2 sc, inc) x6 (24)
5. (3 sc, inc) x6 (30)
6. (4 sc, inc) x6 (36)
7. (5 sc, inc) x6 (42)
8. – 16. sc 42 (sc 42 for 9 rounds)
17. (5 sc, dec) x 6 (36)
18. (4 sc, dec) x6 (30), begin stuffing the body
19. (3 sc, dec) x6 (24)
20. (2 sc, dec) x6 (18)
21. (sc, dec) x6 (12)
22. dec x 6 (6), Fasten off
Front legs (make 2):
1. start with grey: sc 6 into mr.
2. incx6 (12)
3. switch to white yarn: sc 12
4.-6. sc 12, Fasten off, leave tail for sewing
Back legs (make 2):
1. follow steps 1-6 of front legs but do not fasten off
2. ch 1, turn, sc 6 (6)
3. ch 1, turn, sc 6 (6)
4. ch 1, turn, sc 6 (6), Fasten off
Spouts (make 2 in grey):
1. sc 6 into mr
2. inc x6 (12)
3. (sc, inc) x 6 (18)
4. (2 sc, inc) x 6 (24)
5. (3 sc, inc) x 6 (30)
Tail (make 1):
Either braid three pieces of white yarn into a tail to make a 3-4 cm long tail or make a basic crochet cord using this technique:
Make a slip knot on the needle, leaving a long tail. wrap working yarn around index finger and yarn tail around thumb, so both sides of the yarn make kind of a v-shape. hold on to the bottom of the slipknot with your right hand to make sure it stays straight. loop the yarn tail on your thumb around the needle from front to back so that you have two loops on your hook. yarn over with the working yarn from your index finger and pull the working yarn through both loops on the hook, repeat until desired length.
Fasten off and fray the yarn ends on the tail.
Assembly
Sew legs onto bottom of body slightly pointing outwards.
Use pins to fix legato body and try out the best placement before sewing.
Sew snout to head. sew one spot to side of the head and one to the top of the body. sew ears to head.
Embroider eyes on head (or use oval safety eyes) and nose holes on snout. attach tail to body
Designer: laststitchontheleft
