
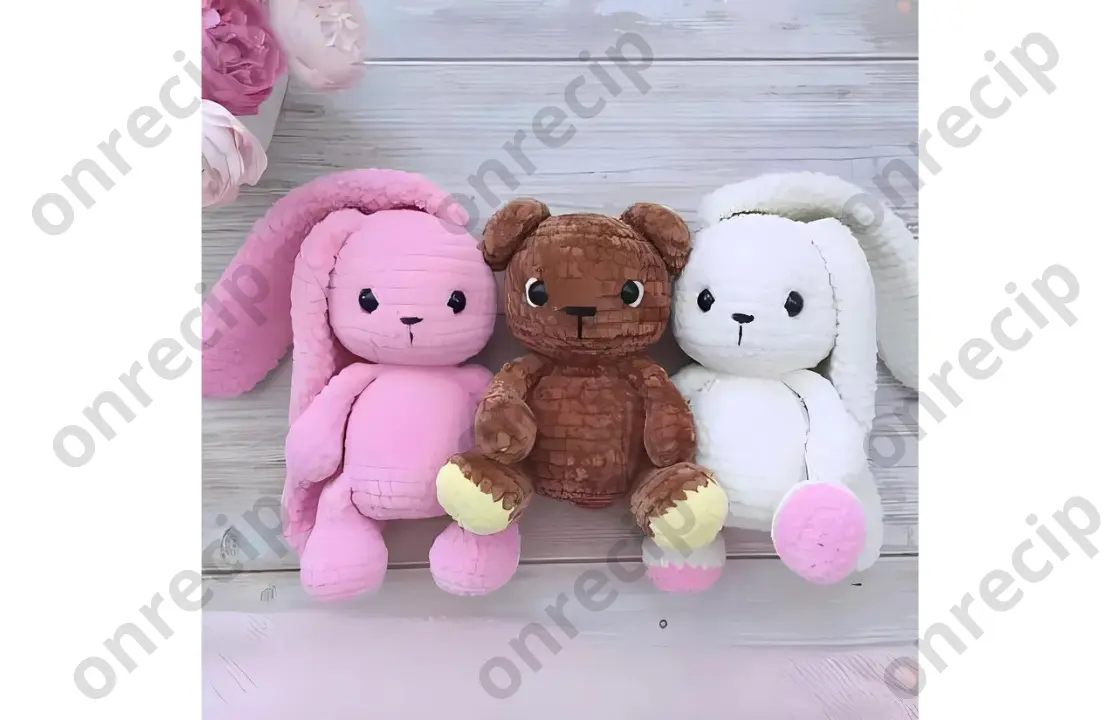
Skill Level: Easy
This free crochet pattern by Yulia Rossamakhina @uliyaross provides instructions to create plush babies: a bear and a bunny. You can use any plush yarn like Himalaya Dolphin Fine, Himalaya Dolphin Baby, Himalaya Velvet, or other similar types to make these cute amigurumi toys.
Finished Size: Approximately 20 cm
Materials and Tools:
- Plush yarn (1 skein per toy)
- YarnArt Jeans for embroidering the nose
- Crochet hook size 3.5-4 mm
- Safety eyes for toys
- Stuffing material
- Needle for sewing parts
- Scissors
Abbreviations:
- MR: magic ring
- ch: chain
- sl st: slip stitch
- sc: single crochet
- inc: increase
- dec: decrease
- (…) x n: repeat n times
Crochet Pattern for Bear and Bunny Amigurumi
Head
Stuff as you go:
- 6 sc in MR (6)
- inc x 6 (12)
- inc x 12 (24)
- (3 sc, inc) x 6 (30)
- (4 sc, inc) x 6 (36)
- (5 sc, inc) x 6 (42)
7-13. 7 rows of 42 sc - (5 sc, dec) x 6 (36)
- (4 sc, dec) x 6 (30)
- (1 sc, dec) x 10 (20)
- 20 sc
Fasten off and leave a long tail for sewing.
Arms (make 2)
Stuff the base of the arm:
- 6 sc in MR (6)
- inc x 6 (12)
3-4. 12 sc (2 rows) - 3 sc, (dec) x 3, 3 sc (9)
6-11. 9 sc (6 rows)
Work 2 sc, then crochet 4 sc together. Fasten off, leaving a long tail for sewing.
Bunny Legs (make 2)
Stuff the lower part of the leg as you crochet. Begin with a chain of 6 ch using a contrasting color. Work as follows from the second chain from the hook:
- inc, 3 sc, inc in the next 3 sc, 4 sc (12)
- (inc) x 2, sc, inc, sc, (inc) x 3, (sc, inc) x 2 (20)
Switch to main color yarn: - 20 sc in the back loops only
4-5. 20 sc (2 rows) - 6 sc, (dec) x 6, 2 sc (14)
- 5 sc, (dec) x 4, 1 sc (10)
8-10. 10 sc (3 rows) - Work 2-3 sc (adjust to your crochet tension), then crochet 5 sc together.
Fasten off and leave a long tail for sewing.
Bear Legs (make 2)
Stuff the legs as you go:
1-7. Follow the same pattern as for the bunny legs.
8-9. 10 sc (2 rows)
Fasten off, leaving a long tail for sewing.
Body
Stuff as you crochet. Begin with a chain of 8 ch. Work as follows from the second chain from the hook:
- inc, 2 sc, inc, 2 sc, inc in the next 3 sc, 2 sc, inc, 3 sc (18)
- (inc) x 2, 6 sc, (inc) x 3, 6 sc, inc (24)
- (inc, 3 sc) x 6 (30)
4-10. 30 sc (7 rows) - (4 sc, dec) x 5 (25)
- 25 sc
- (3 sc, dec) x 5 (20)
- 20 sc
Fasten off, leaving a long tail for sewing.
Tail
- 6 sc in MR (6)
- inc x 6 (12)
- (2 sc, inc) x 4 (16)
- 16 sc
- (dec) x 8 (8)
Stuff the tail and fasten off, leaving a long tail for sewing.
Bunny Ears (make 2)
Use a 4 mm hook. Crochet loosely for a length of approximately 21 cm.
- 6 sc in MR (6)
- inc x 6 (12)
- 12 sc
- (1 sc, inc) x 6 (18)
5-28. 18 sc (24 rows) - (1 sc, dec) x 6 (12)
- 12 sc
- (2 sc, dec) x 3 (9)
Work 4 sc together, fasten off, leaving a long tail for sewing.
Bear Ears (make 2
- 6 sc in MR (6)
- inc x 6 (12)
- (1 sc, inc) x 6 (18)
- 18 sc
- (1 sc, dec) x 6 (12)
Work 6 sc together for a flat base. Fasten off, leaving a long tail for sewing.
Assembly and Detailing:
- Sew the head to the body, adding extra stuffing to the neck.
- Attach the arms between the 13th and 14th rows of the body, about 4-5 stitches apart.
- Attach the ears:
- Bunny: between the 4th and 5th rows of the head, about 8-9 stitches apart.
- Bear: 3 rows from the top of the head.
- Sew the safety eyes between the 10th and 11th rows of the head, with about 9 stitches between them.
- Embroider the nose between the 12th and 13th rows.
- Attach the legs:
- Bear: between the 4th and 6th rows, about 11 stitches apart.
- Bunny: between the 4th and 5th rows, about 10-11 stitches apart, or attach them with buttons.
- Attach the tail between the 3rd and 5th rows of the body.
Your plush bear and bunny are now complete! Feel free to share your creations on social media by tagging @uliyaross.
Author: Yulia Rossamakhina / translated by onrecip
Enjoy!