
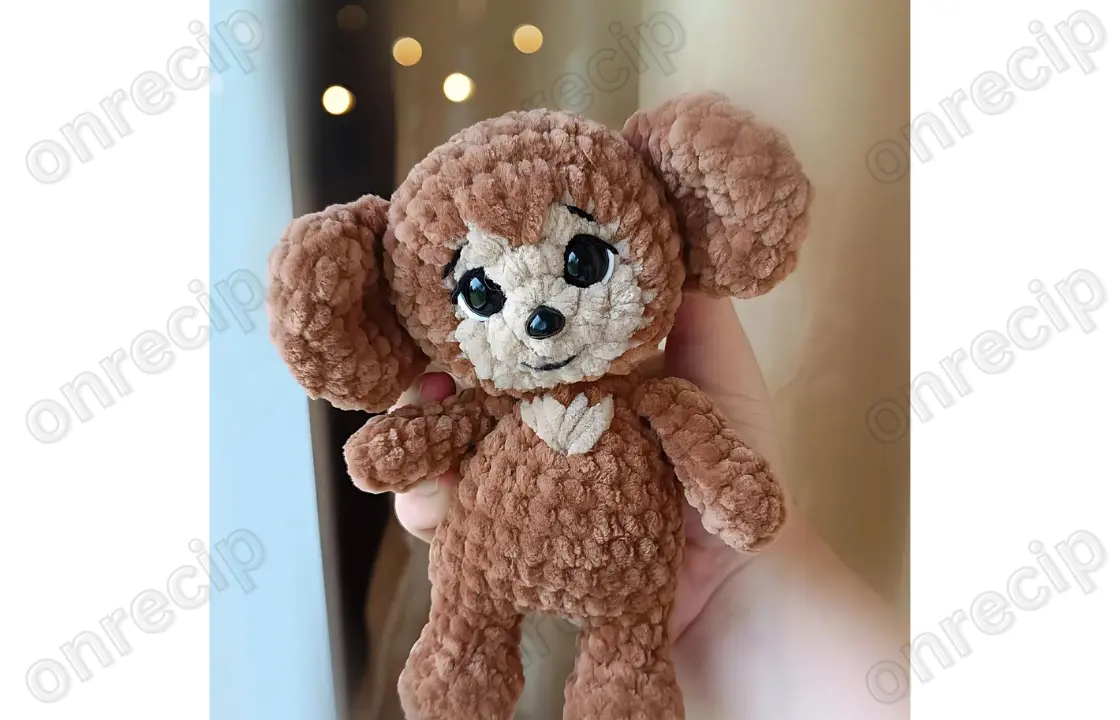
How to Crochet Cheburashka: Step-by-Step Guide for Beginners
Creating a plush Cheburashka crochet toy is a delightful and rewarding project for both beginners and experienced crocheters. Cheburashka, the lovable character from Russian literature, comes to life through this detailed crochet pattern. In this guide, we will outline the necessary materials, step-by-step instructions for the different parts of Cheburashka, and how to assemble the finished toy. Let’s get started on your next crochet plush project!
Materials Needed for Crocheting Cheburashka
Before starting the project, it’s important to gather the right crochet materials to ensure your work comes together beautifully. Here’s what you’ll need:
- Yarn:
- Himalaya Dolphin Baby (plush yarn) – Main color (80337) for Cheburashka’s body and additional color (80317) for accents.
- Black and white cotton-acrylic yarn like YarnArt Jeans for the facial details.
- Stuffing: Hollowfiber stuffing to give your Cheburashka toy its shape.
- Crochet Hook: A 4 mm hook, perfect for working with plush yarn.
- Safety Eyes: 12 mm eyes to give your toy its signature adorable look.
- Glue-on Nose: A 9 mm nose to complete Cheburashka’s face.
- Head Attachment: 25 mm joint for securing the head to the body.
- Thread for Sculpting: Strong thread to help shape Cheburashka’s face.
- Needle: A long needle for facial sculpting and assembling the parts.
Essential Crochet Stitches and Abbreviations
Before diving into the pattern, familiarize yourself with the basic crochet stitches and abbreviations used throughout the instructions:
- MR: Magic Ring
- CH: Chain Stitch
- SC: Single Crochet
- INC: Increase
- DEC: Decrease
- SS: Slip Stitch
- (…) x N: Repeat the sequence N times
Crocheting the Ears (Make 2)
Cheburashka’s ears are one of his most recognizable features. Follow these steps to crochet the large, floppy ears:
- Using the main color yarn, make 8 SC into a Magic Ring (MR) (8).
- Work 8 increases by crocheting 2 SC into each stitch (16).
- (1 SC, INC) repeat around the circle (24).
- Crochet 24 SC around (24).
- (DEC) 12 times to reduce the stitch count (12).
After completing the ear, fold it in half and crochet the edges together using 6 SC. Fasten off and secure the yarn. Repeat this process for the second ear.
Crocheting the Upper Arms (Make 2)
The next step is crocheting Cheburashka’s arms. They are small, simple, and don’t require stuffing:
- Crochet 6 SC into a Magic Ring (MR) (6).
2-7. Crochet 6 SC for six rows (6).
Fold the arm in half and crochet it closed using 3 SC. Fasten off and secure the yarn. Repeat for the second arm.
Crocheting the Tail
Cheburashka’s tail is small and cute. Follow these instructions to make it:
- Crochet 6 SC into a Magic Ring (MR) (6).
- Work 6 increases by crocheting 2 SC into each stitch (12).
- (DEC) 6 times to reduce the stitch count (6).
Leave a long tail for sewing and lightly stuff the tail.
Crocheting the Lower Legs and Body
The legs and body are worked as one piece, starting from the legs and moving upward to form the torso:
- Crochet 6 SC into a Magic Ring (MR) (6).
- Work 6 increases by crocheting 2 SC into each stitch (12).
- Crochet 12 SC around (12).
- (1 SC, DEC) x3, 3 SC (9).
- (DEC, 1 SC) x2, 4 SC (7).
- Crochet 7 SC around (7).
Fasten off the first leg. For the second leg, crochet an additional 4-5 SC to position the start of the next round on the inner side of the leg. Now, begin the body:
- Crochet 7 SC around the first leg, 4 SC along a chain of 4 stitches connecting the legs, then 7 SC around the second leg and 4 SC along the chain (22 stitches total).
- Increase the body’s size by crocheting 4 SC, INC, 8 SC, INC, 8 SC (24). Ensure the increases are on the sides.
9-12. Crochet 24 SC for four rows (24). - (4 SC, DEC) repeat 4 times (20).
- (3 SC, DEC) repeat 4 times (16).
- (2 SC, DEC) repeat 4 times (12).
Now, attach the upper arms to the body:
- Crochet 2 SC, 3 SC with the arm, 3 SC, 3 SC with the arm, 1 SC (12).
- Crochet 12 SC around (12).
Stuff the body firmly and insert the joint to attach the head later.
- Finish the body by making 6 decreases (DEC). Fasten off and close the body.
Crocheting the Head
The head is created separately and attached to the body with a joint. Here’s how to make it:
- Using the additional color yarn, crochet 8 SC into a Magic Ring (MR) (8).
- (INC) repeat 8 times (16).
- (1 SC, INC) repeat 8 times (24). Switch to the main color yarn.
- (2 SC, INC) repeat 8 times (32).
5-7. Crochet 32 SC around (32).
Attach the ears in the next row:
- Crochet 6 SC, 6 SC with the ear, 9 SC, 6 SC with the other ear, 5 SC (32).
- (2 SC, DEC) repeat 8 times (24).
Place the safety eyes between rows 2 and 3, ensuring 2-3 SC between them for symmetry.
Insert the joint and attach the head to the body. Stuff the head evenly as you go.
- (1 SC, DEC) repeat 8 times (16).
- (DEC) repeat 8 times. Fasten off and close the ring completely.
Sculpting Cheburashka’s Face
Facial sculpting adds personality to Cheburashka’s features. Using strong thread, insert a long needle between the neck and head, following sculpting guidelines to form the cheeks, eyebrows, and other details.
Adding the Final Details
To complete your Cheburashka crochet toy, embroider the facial details, including the whites of the eyes, eyebrows, and smile. Don’t forget to:
- Embroider the chest and a small triangle on the face.
- Attach the glue-on nose.
- Sew on the tail.
Now your Cheburashka plush toy is ready to be cherished!
Conclusion
This Cheburashka crochet pattern is perfect for creating a soft, plush toy that will bring joy to anyone who sees it. Whether you’re crafting it for yourself or as a gift, the finished project is sure to be a hit! Enjoy your crocheting journey!
Author – @olga_toys_ugorsk / translated by onrecip
Enjoy!
