
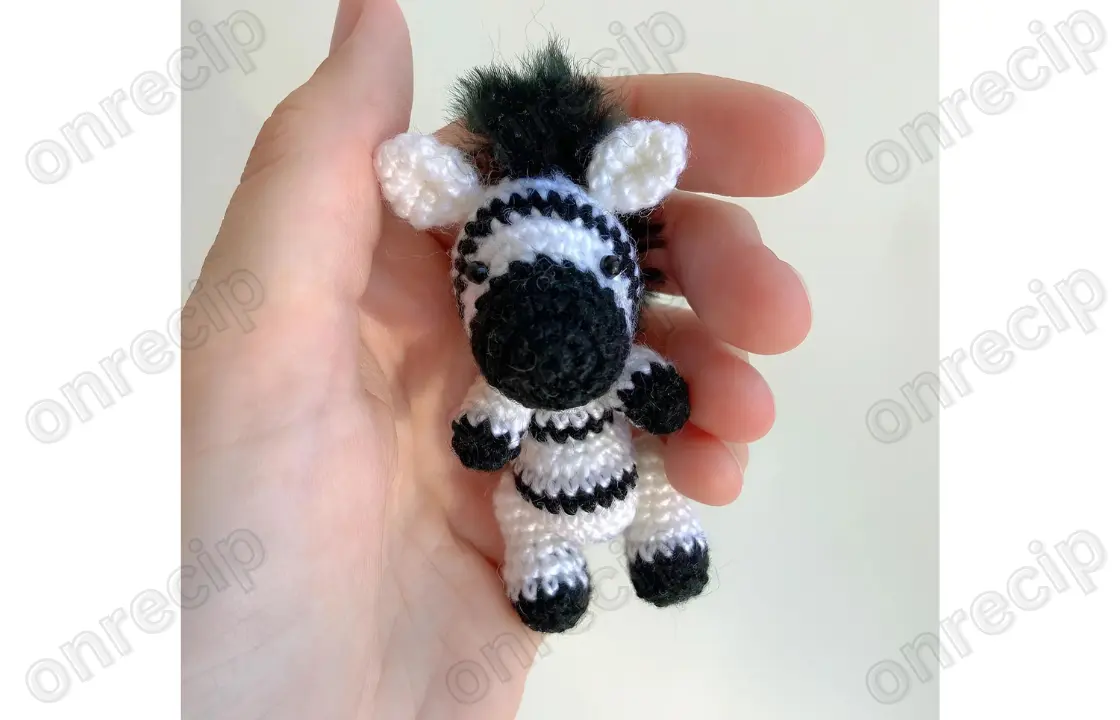
How to Crochet an Adorable Mini Zebra: A Step-by-Step Guide
Crocheting a mini zebra is a delightful and creative project that both beginners and seasoned crocheters can enjoy. Whether you’re looking to enhance your crochet skills or simply want to make an adorable handmade toy, this crochet zebra pattern is perfect. In this guide, we will walk you through the process with easy-to-follow instructions, ensuring you create a charming and unique crochet zebra toy that stands out.
Materials for Crocheting the Zebra
Before getting started, it’s essential to gather the right crochet materials to ensure your project goes smoothly. Here’s what you’ll need:
- Yarn: Vita Brilliant (380 m /100 g) in two contrasting colors (black and white), perfect for creating that signature striped look.
- Crochet hook: 1.5 mm – the ideal size for making tight, neat stitches.
- Eyes: 3 mm plastic safety eyes, essential for giving your zebra toy its adorable facial expression.
- Other tools: Stuffing, needle, pins, and scissors for assembling your crochet zebra.
This crochet zebra will measure approximately 8 cm when finished, making it a perfect miniature crochet project for your collection or as a gift.
Important Crochet Terms to Know
For those new to crochet or anyone needing a refresher, here are some important terms used in this pattern:
- MR: Magic Ring
- SC: Single Crochet
- CH: Chain Stitch
- SS: Slip Stitch
- INC: Increase (adding a stitch)
- DEC: Decrease (removing a stitch)
These basic crochet stitches and techniques will help you create the perfect shape and details for your zebra toy.
Crocheting the Zebra’s Head
The head is the most important part of your crochet zebra, requiring attention to detail. You will alternate between the black and white yarn to create a striking striped pattern.
Steps to Crochet the Head:
- Begin with black yarn.
- Round 1: Crochet 6 SC into a Magic Ring (MR).
- Round 2: Make 6 increases (12 stitches total).
- Round 3: (1 SC, INC) x6 (18 stitches total).
- Rounds 4-5: Crochet 18 SC across two rows.
- Switch to white yarn (without cutting the black yarn).
- Round 6: Crochet 18 SC.
- Round 7: Crochet 7 SC, make 4 increases, then crochet 7 SC (22 stitches total).
- Round 8: Crochet 7 SC, INC, 6 SC, INC, 7 SC (24 stitches total).
- Switch back to black yarn.
- Round 9: (3 SC, INC) x6 (30 stitches total).
- Switch to white yarn.
- Rounds 10-12: Crochet 30 SC for three rows.
- Switch to black yarn again.
- Round 13: (3 SC, DEC) x6 (24 stitches total).
- Switch to white yarn.
- Round 14: (2 SC, DEC) x6 (18 stitches total).
- Stuff the head firmly using fiberfill or your preferred stuffing material to maintain its shape.
- Finish the head.
- Round 15: (1 SC, DEC) x6 (12 stitches total).
- Round 16: Make 6 decreases, fasten off, cut the yarn, and hide the ends securely inside the head.
Crocheting the Zebra’s Body
The next step is crafting the zebra’s body, which uses simple shaping and color changes to match the head.
Steps to Crochet the Body:
- Begin with black yarn.
- Round 1: Crochet 6 SC into a Magic Ring (MR).
- Round 2: Make 6 increases (12 stitches total).
- Switch to white yarn.
- Round 3: (1 SC, INC) x6 (18 stitches total).
- Round 4: (2 SC, INC) x6 (24 stitches total).
- Round 5: Crochet 24 SC.
Crocheting the Zebra’s Ears
The ears add charm and character to your crochet zebra. You will crochet two identical pieces.
Steps to Crochet the Ears:
- Start with black yarn.
- Round 1: Crochet 6 SC into a Magic Ring (MR).
- Round 2: (1 SC, INC) x3 (9 stitches total).
- Round 3: (2 SC, INC) x3 (12 stitches total).
- Round 4: Crochet 12 SC.
- Switch to white yarn.
- Round 5: (2 SC, DEC) x3 (9 stitches total).
- Fasten off, fold the ear in half, and sew the edges together. Leave a long tail for sewing the ear to the head.
Crocheting the Zebra’s Arms
The zebra’s arms will also be made using alternating black and white yarn.
Steps to Crochet the Arms:
- Start with black yarn.
- Round 1: Crochet 6 SC into a Magic Ring (MR).
- Round 2: Make 6 increases (12 stitches total).
- Rounds 3-4: Crochet 12 SC across two rows.
- Switch to white yarn.
- Round 5: (1 SC, DEC) x3 (6 stitches total).
- Rounds 6-7: Crochet 6 SC across two rows.
- Stuff the arms, fasten off, and sew the opening closed.
Crocheting the Zebra’s Legs
The legs follow a similar method to the arms but with fewer rounds.
Steps to Crochet the Legs:
- Start with black yarn.
- Round 1: Crochet 6 SC into a Magic Ring (MR).
- Round 2: (1 SC, INC) x3 (9 stitches total).
- Rounds 3-4: Crochet 9 SC across two rows.
- Switch to white yarn.
- Rounds 5-6: Crochet 9 SC across two rows.
- Stuff the legs, fasten off, and sew the opening closed.
Crafting the Zebra’s Tail
To give your zebra a realistic finishing touch, you will crochet a small tail and add a yarn tassel at the end.
Steps to Crochet the Tail:
- Using white yarn, chain 11 stitches, then crochet 10 Slip Stitches (SS) starting from the second chain from the hook.
- Add a black yarn tassel at the end of the tail to create the iconic zebra look.
Assembling the Crochet Zebra
Now that all the parts are finished, you’ll need to sew them together to complete your crochet zebra.
Steps to Assemble the Zebra:
- Sew the ears to the head between rows 11-12, leaving 6 SC between them.
- Attach the eyes between rows 7-8 of the face, ensuring they’re aligned near the increases from row 7.
- Sew the head securely onto the body.
- Attach the arms using thread jointing or sewing, positioning them 1 row below the seam where the head and body meet.
- Sew the legs to the body between rows 4-5 on either side.
- Create the mane by cutting strands of black yarn. Insert 2 strands into each row along the center of the head, starting between the ears and continuing down to where the head connects to the body. Brush the yarn to give it a fluffy look.
- Attach the tail securely to the body between rows 4-5 on the back.
By following this detailed crochet pattern, you’ll have a beautifully handcrafted zebra that’s perfect for gifting or displaying. This crochet zebra is a fun and rewarding project that will leave you with a unique and lovable stuffed toy! Happy crocheting!
Author – @scandistyle_dolls / translated by onrecip
Enjoy!

